
- Remember me Forgot password?

Enter the URL of BMAP service:https://bmap.sjtu.edu.cn/
Enter your user ID and password, then click "Login".
If you don't have a BMAP account,please select “Register”.
After logging in, you can see the BMAP main dashboard:

Before the BMAP analysis, the user needs to prepare the data required for the analysis. The analysis platform provides three types of data analysis, namely, individual data analysis, medical record data analysis, and genetic data analysis. Users can choose the appropriate analysis process based on their own research needs. The analysis results can be exported in various formats, such as tables, graphs, and text files.
The BMAP analysis platform supports the use of public and private data sources. Users need to maintain the information of data sources, software, and codes required for the analysis tasks. This includes managing the permissions, access control, and other related details for these analysis components.
After logging in, go to the “my jobs page,select the left side menu "Code Repository" to enter the code repository management
The repository list displays: Add new, delete, modify, and query repository information, support code repository and personnel access control.
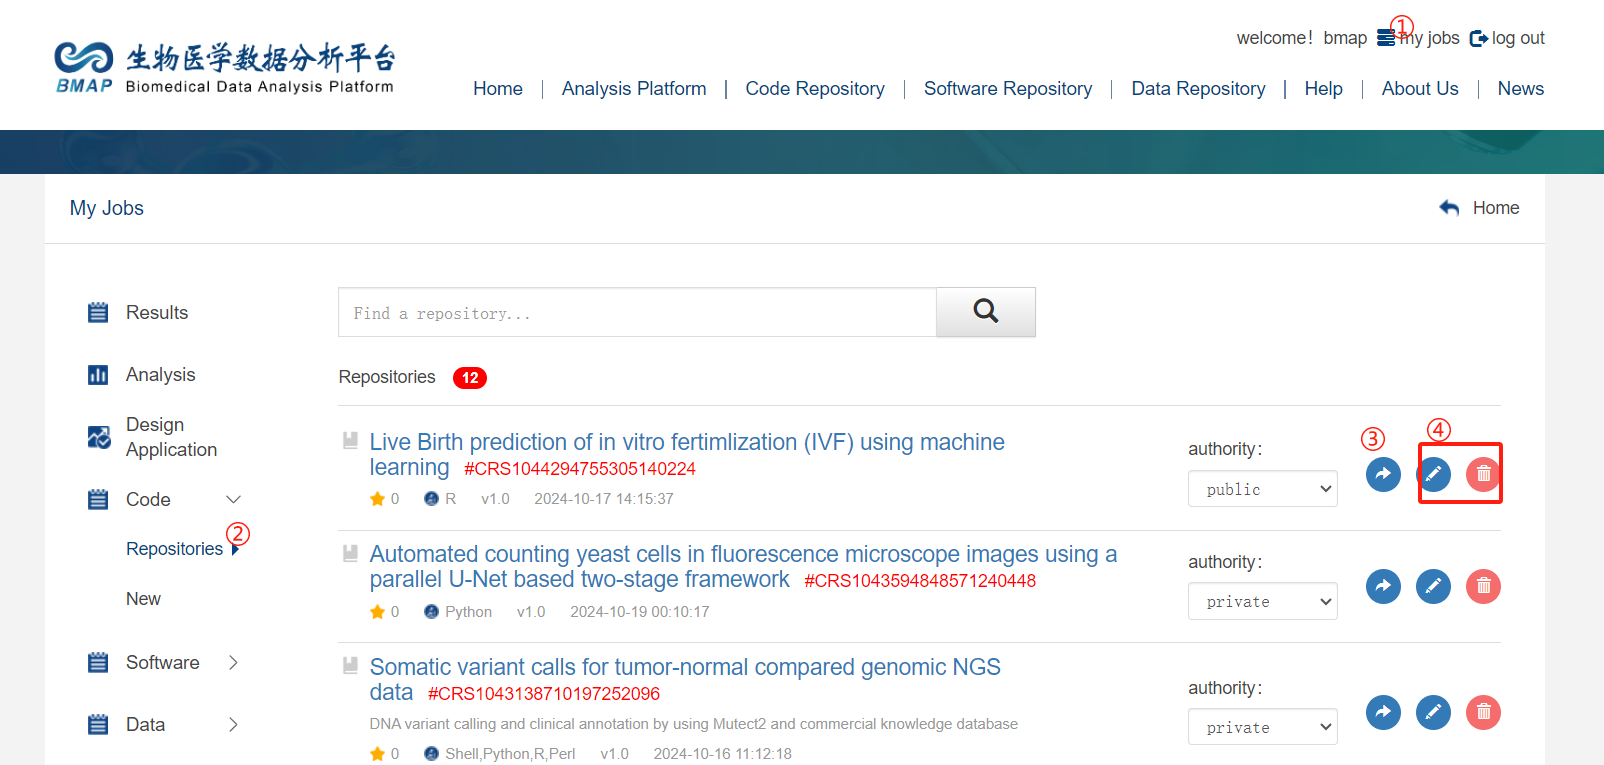
Code Repository Information and Access Support for Code Repository, Code File, and Metadata
Create Code Repository
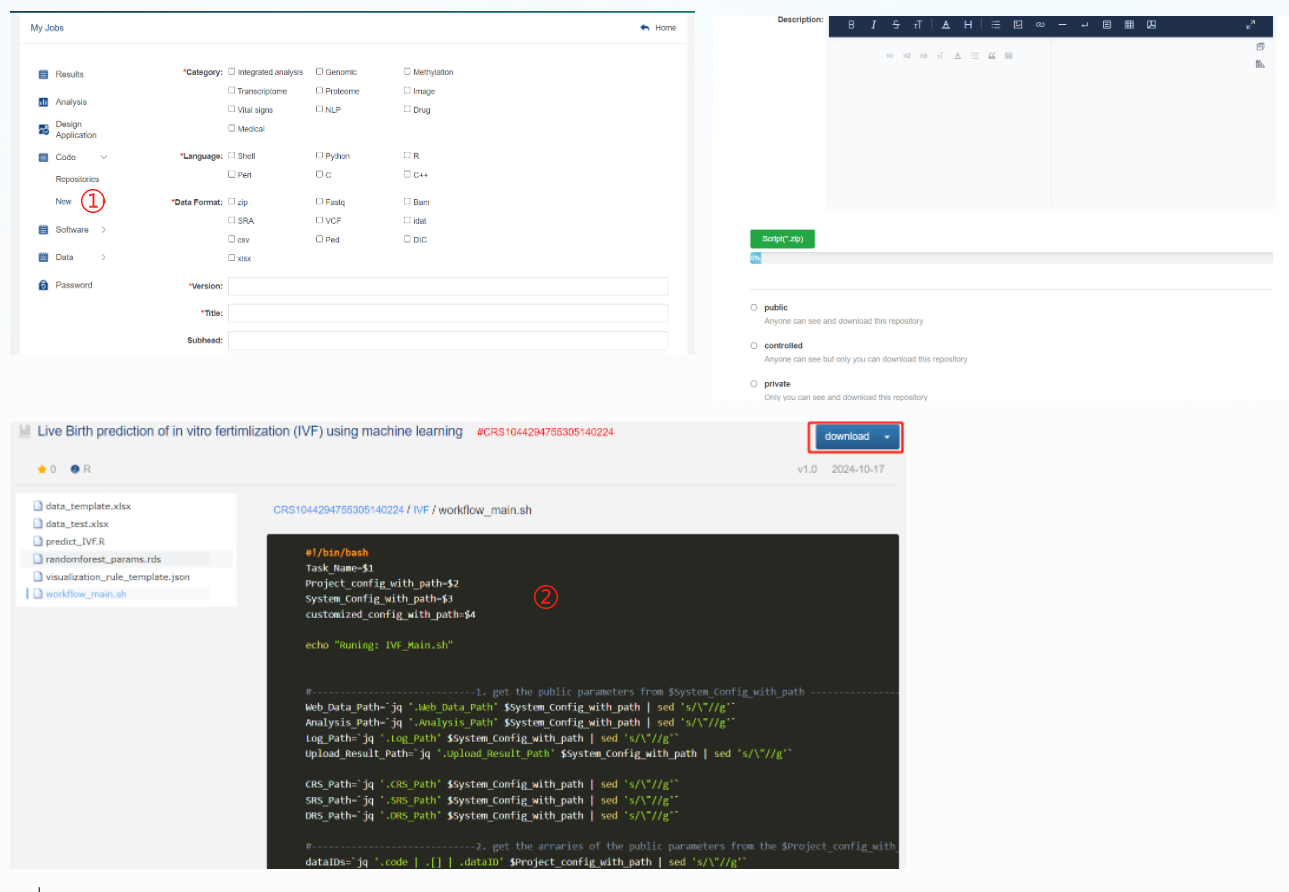
① Click the "New" button to add new files to the code repository.
② Users need to use the shell script "workflow_main.sh" as the entry point, which can be found in the Medi code repository. There is also a workflow called "Live Birth prediction of in vitro fertilization (IVF) using machine learning", which can be directly used by modifying the workflow_main.sh file. The 1-3 steps can be modified as needed, and the parameters required by the script can be filled in accordingly.
Go to the "Software Resipository" or "my jobs" page to access the software repository
The software repository supports adding, deleting, modifying, and querying software information. Users can manage the software and related operations
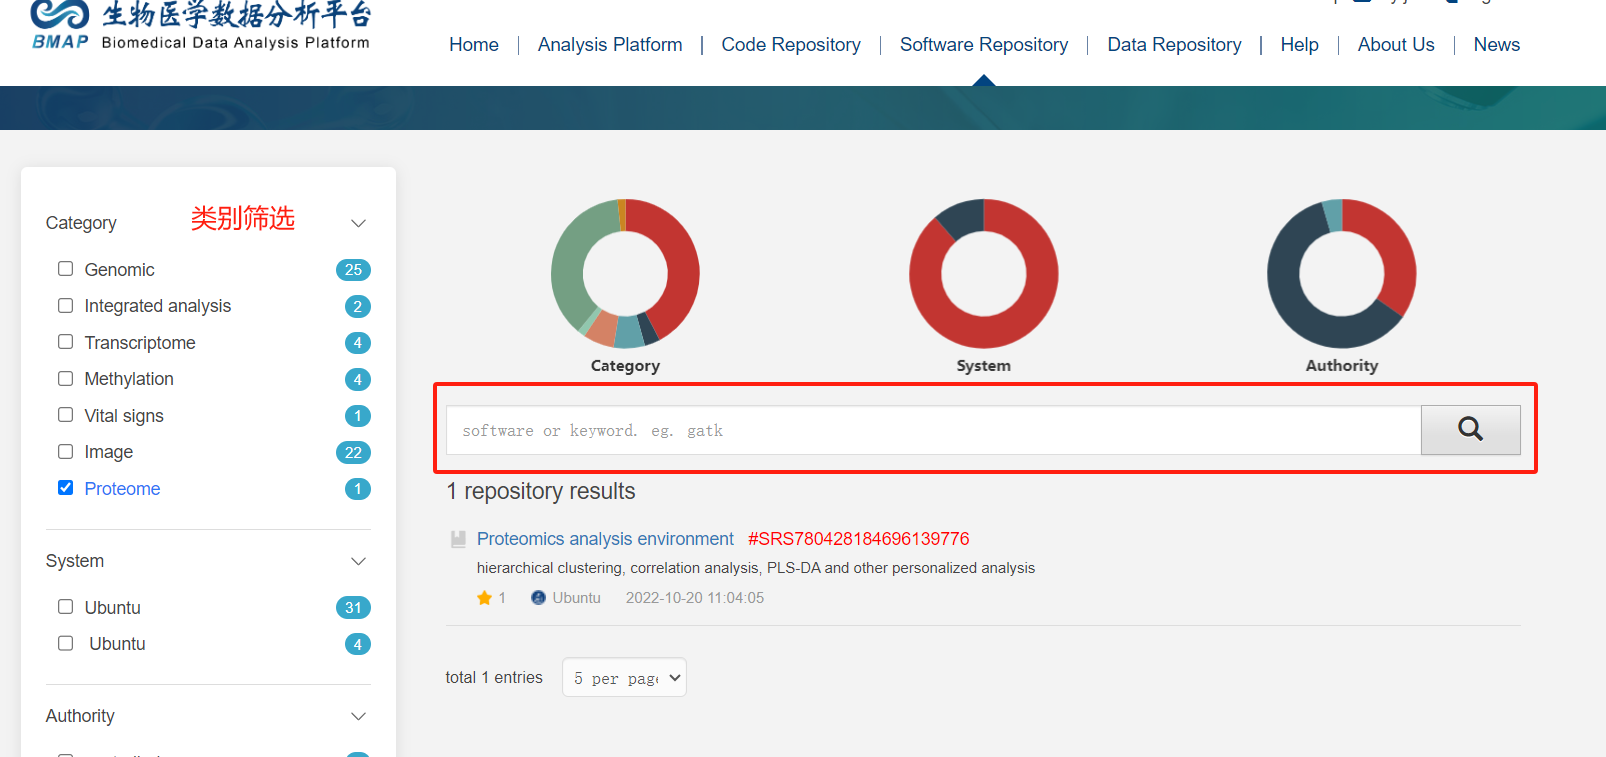
The software repository supports querying, viewing, and analyzing the software information and usage records.
On the "my jobs" page, you can go to the "Software-New" section to add new software information and upload the relevant files.
Go to the "Data Repository" or "my jobs" page to access the data repository, where you can add new data sources, edit existing data, and perform other data management operations.
Data repository management interface
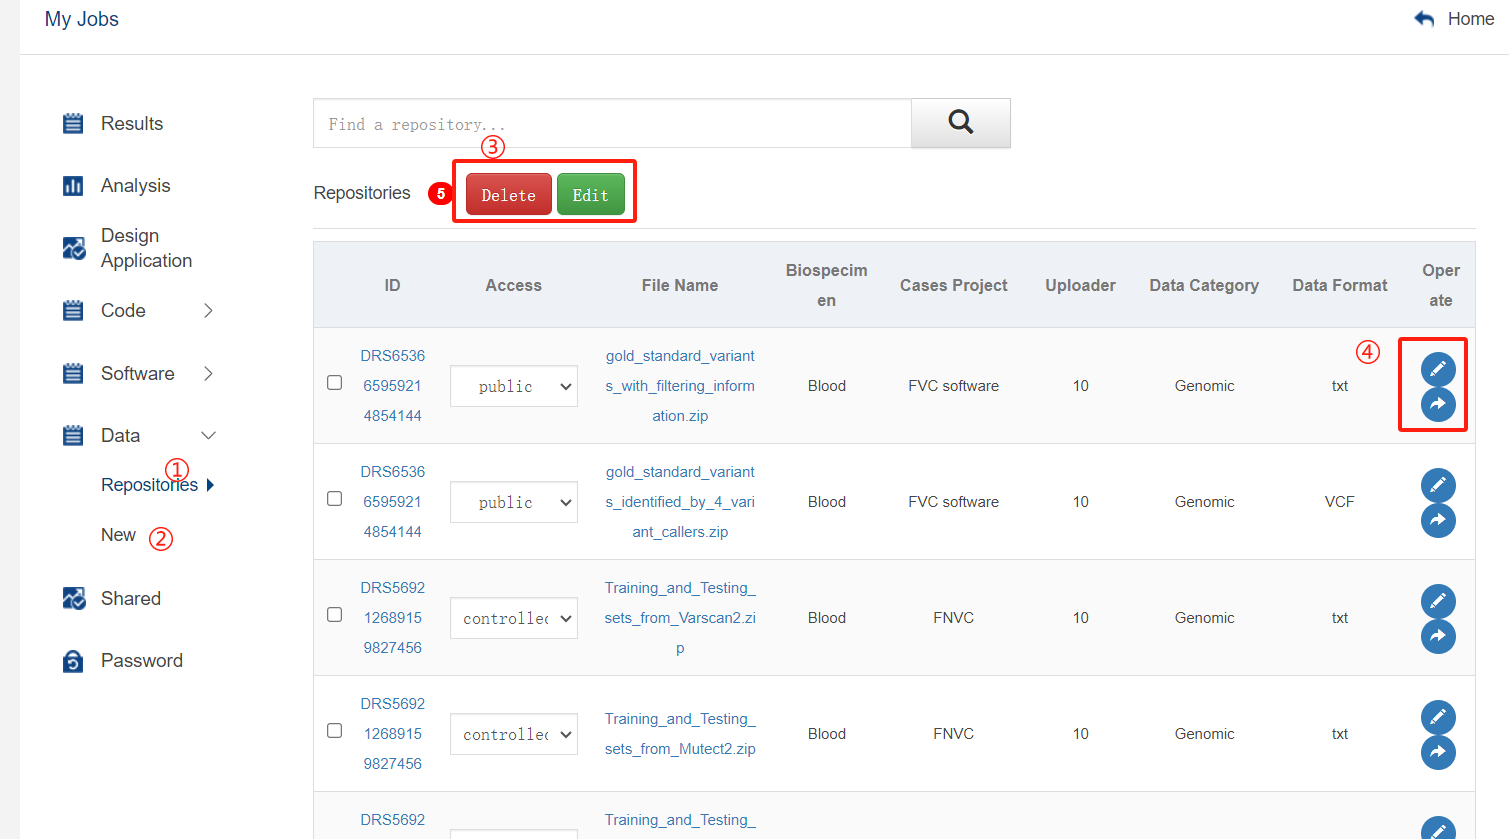
①: Data repository list
②: New data repository
③、④:Operations: View, Delete, Modify, and Share data repository
The user's compliance information, app authorization, and other related details can be set and assigned to the user.
The modules can be shared and linked according to the user's role and permissions.
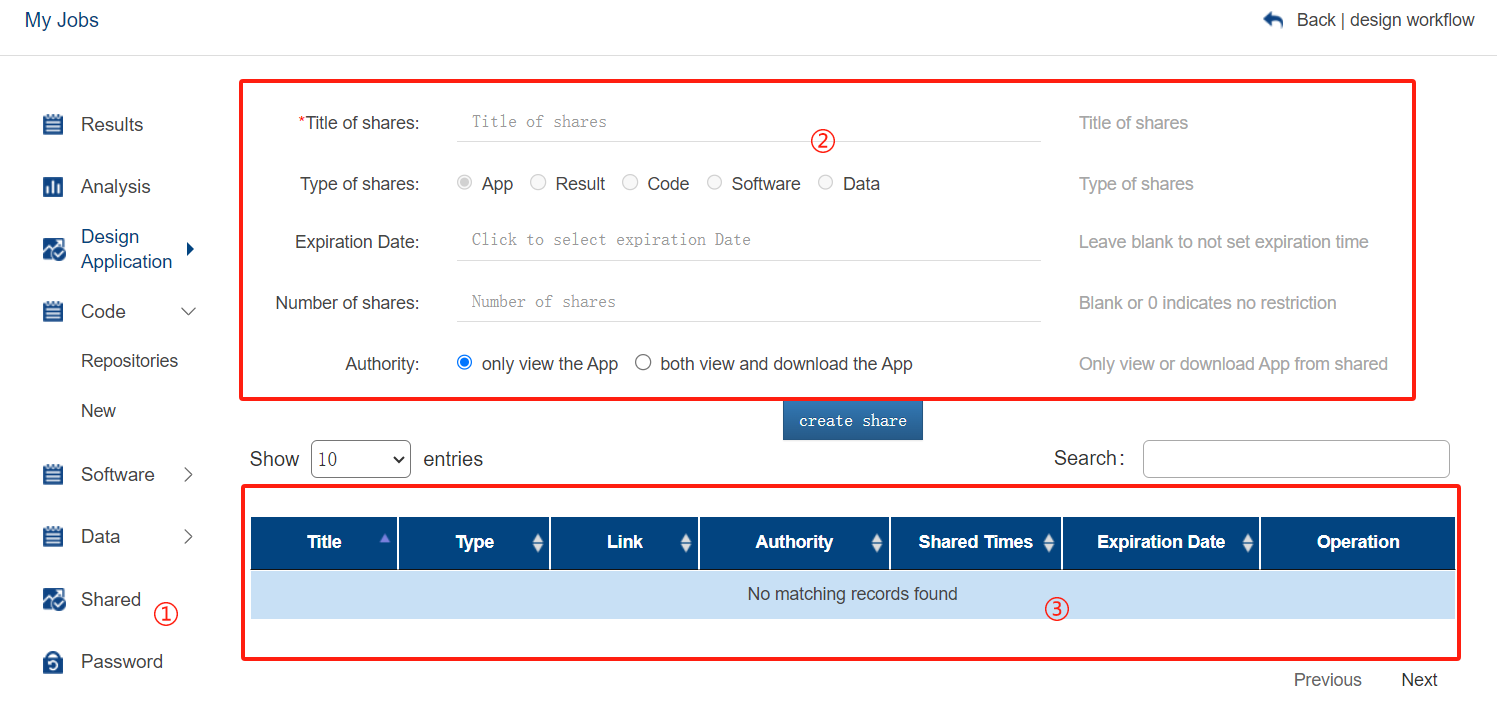
①: Shared module list, which can be assigned to users based on their roles and permissions
②: Modules can be shared and linked, supporting various operations such as viewing, modifying, and deleting. The access and usage of these modules can be controlled.
③: When assigning modules, the system will automatically allocate permissions based on the user's role, ensuring a consistent and standardized sharing mechanism.
Go to the "my jobs" page, select "Design Application" interface.
Interface display:
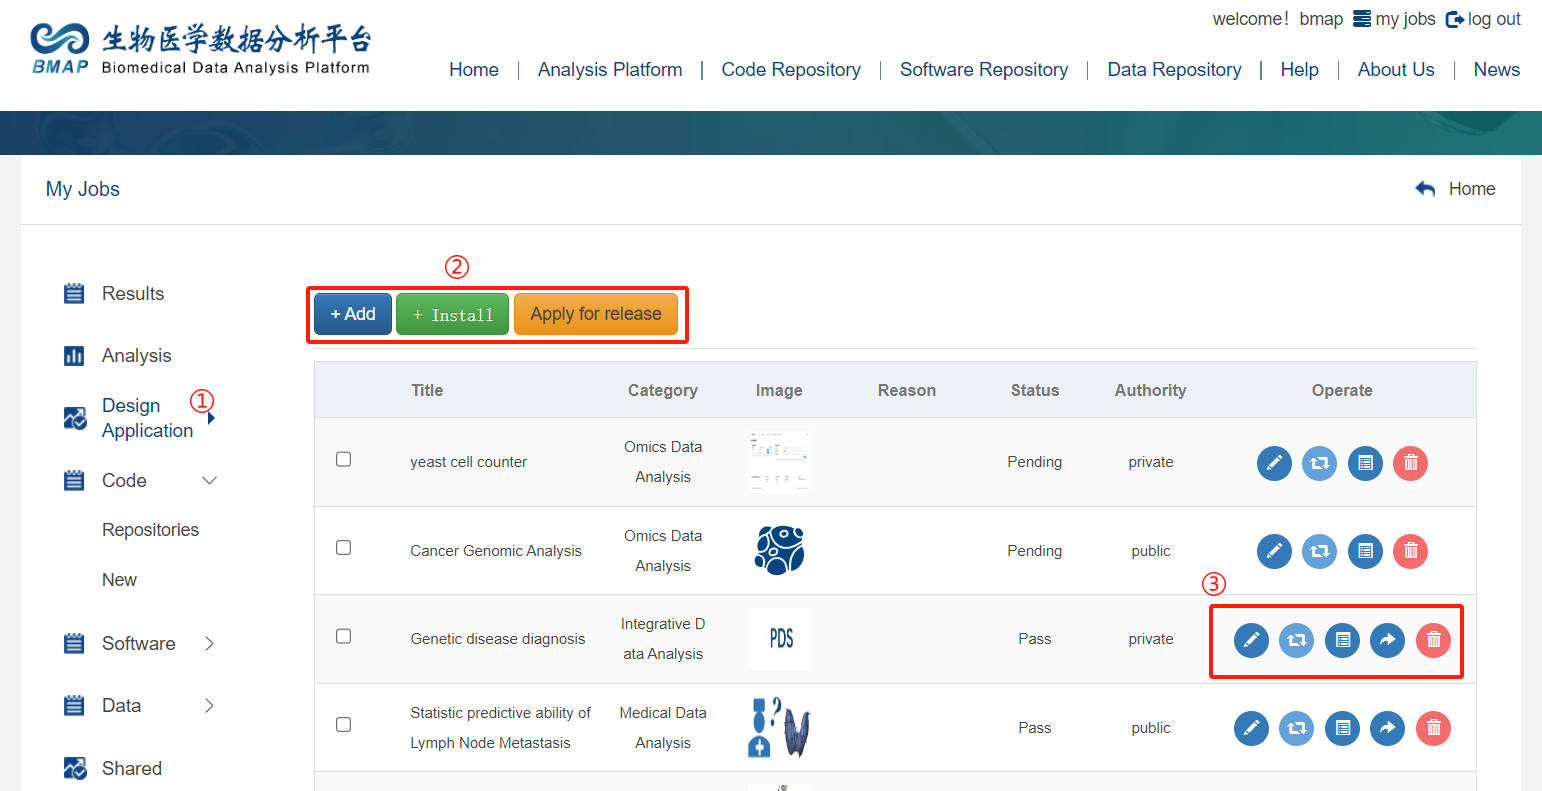
①:Workflow design page entry
②:The operation steps are as follows: add a new App, one-click install the App (download the packaged App and create an App through this one-click installation), and submit for review
③:The steps are as follows: edit the App, design the workflow, create test tasks, share the App, and delete the App
After adding the App, click on the list "Design Workflow" to enter the design page
The design steps are Code Configuration, Software Configuration, and Workflow Design

①:It allows for a preview of Code and Software attachment information, providing an ID to facilitate subsequent parameter entry
②:Add workflows. Multiple groups can be added. Enter information according to the prompts
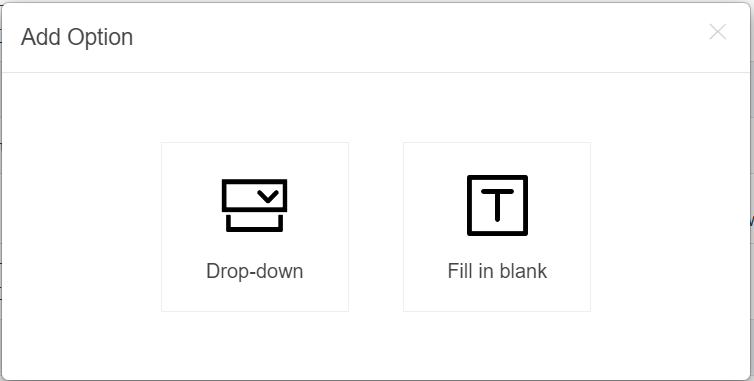
③④⑤:Fields marked in red are public parameters that should be entered based on specific conditions. Users can customize parameter configurations by clicking "Add Option". Types of custom parameter configurations include dropdown options and input box configurations
Click on "Analysis Platform" in the top navigation to select the analysis platform or account, then click on "my jobs" to access the App list. From there, click on "Test" to submit a test analysis task.
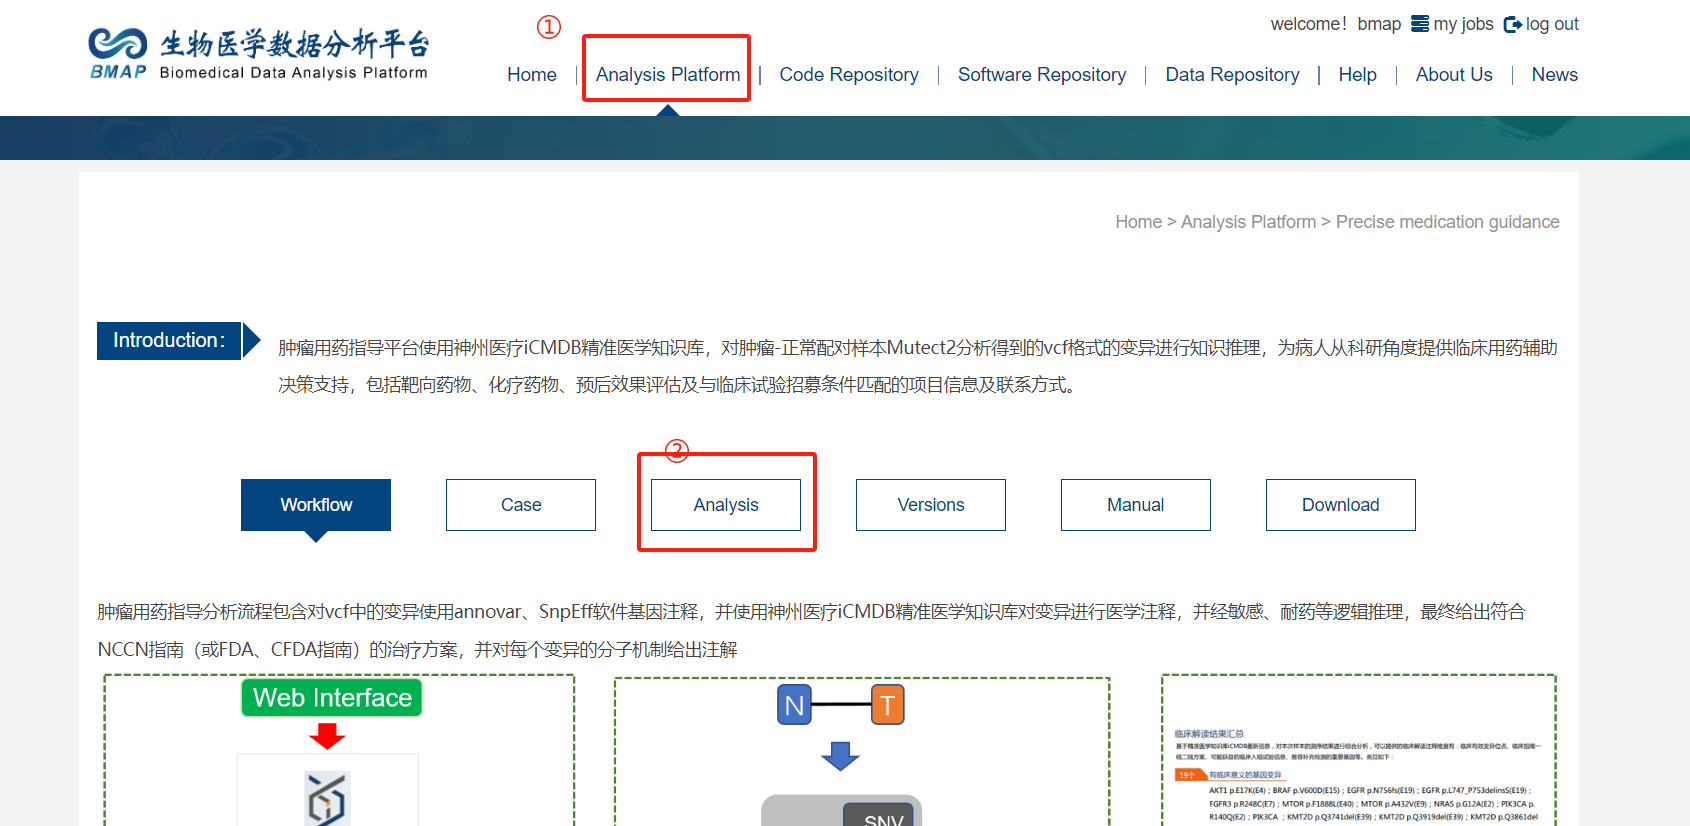
①: Click Analysis Platform to select a platform
②: Click Analysis to enter the task creation page for analysis.
Task creation interface:
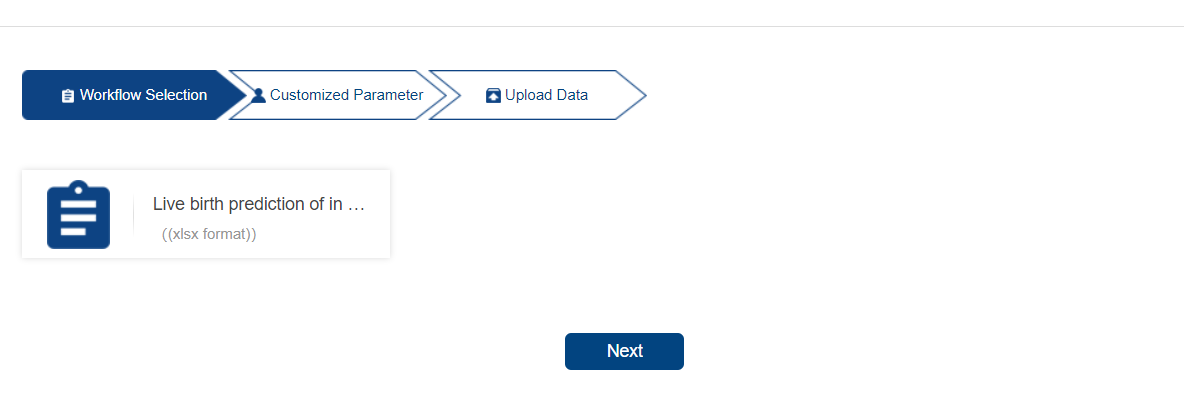
Custom parameter configuration interface:
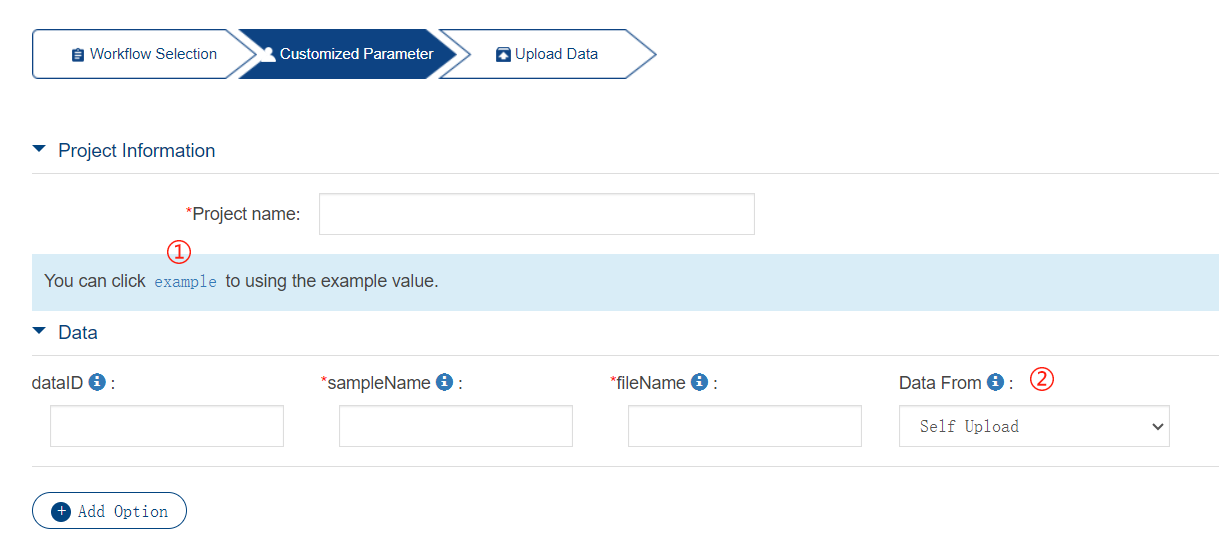
①: Click exampleto use the workflow design to configure the parameter control.The example value will automatically populate the parameter form.
②: If DRS is selected, the second step (Upload Data) does not require uploading data attachments.
After submitting the task, enter the "Result" list interface.
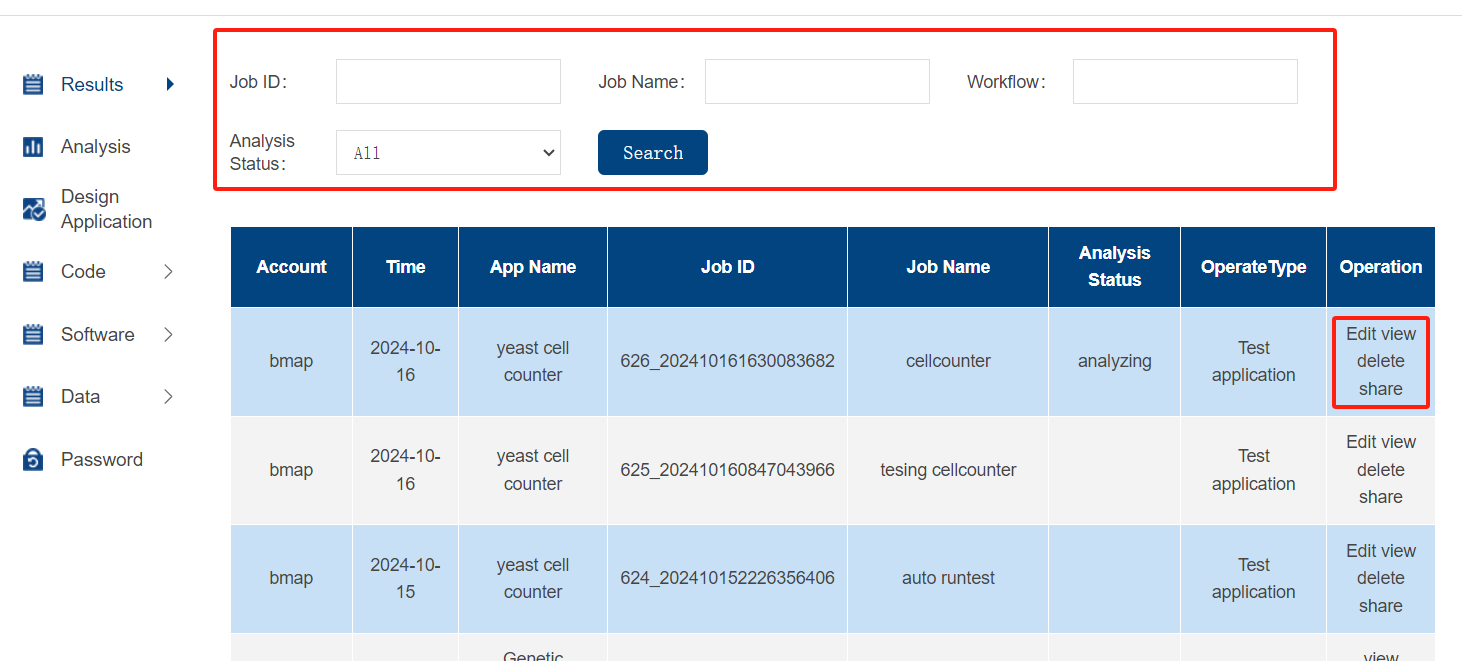
Result supports query functionality. After editing the parameter configuration, the task can be resubmitted.
Supports sharing and deleting results, as well as viewing and downloading detailed results.
Supports downloading and viewing log files in case of task analysis exceptions or other issues.
Using Live birth prediction of in vitro fertilization (IVF) as an example, this document provides a detailed explanation of each step, including parameters and configuration guidelines.
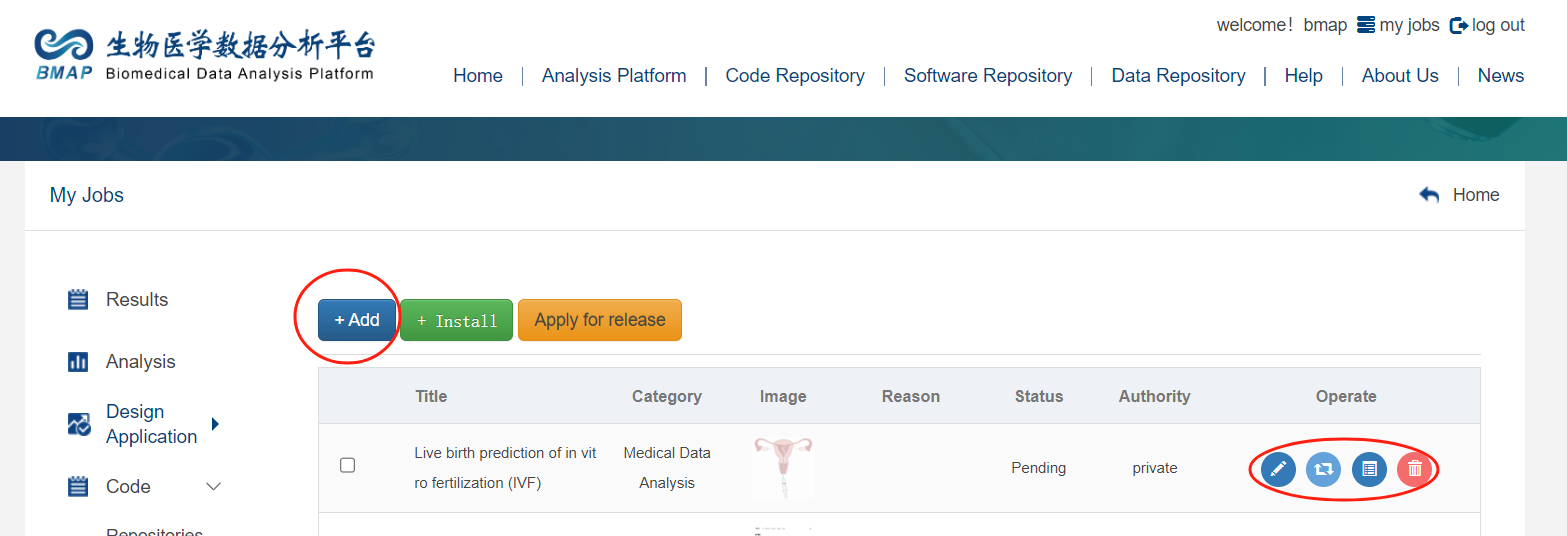
After logging into your account, click the myjobs button in the upper-right corner to access the Design Application list. Click the Add button to configure attributes such as the App name, and then submit it.
After creating the App, it will appear at the top of the list (in reverse order). The newly created App is named "Live birth prediction of in vitro fertilization (IVF)", and its initial status is Pending (not yet tested or submitted for review).
The Operate column in the list includes the following options,"edit" Used to edit the basic information of the App."design application" Used to create the App workflow."test" Used to submit the task for testing and analysis."delete" Used to delete the App.
design application for IVF
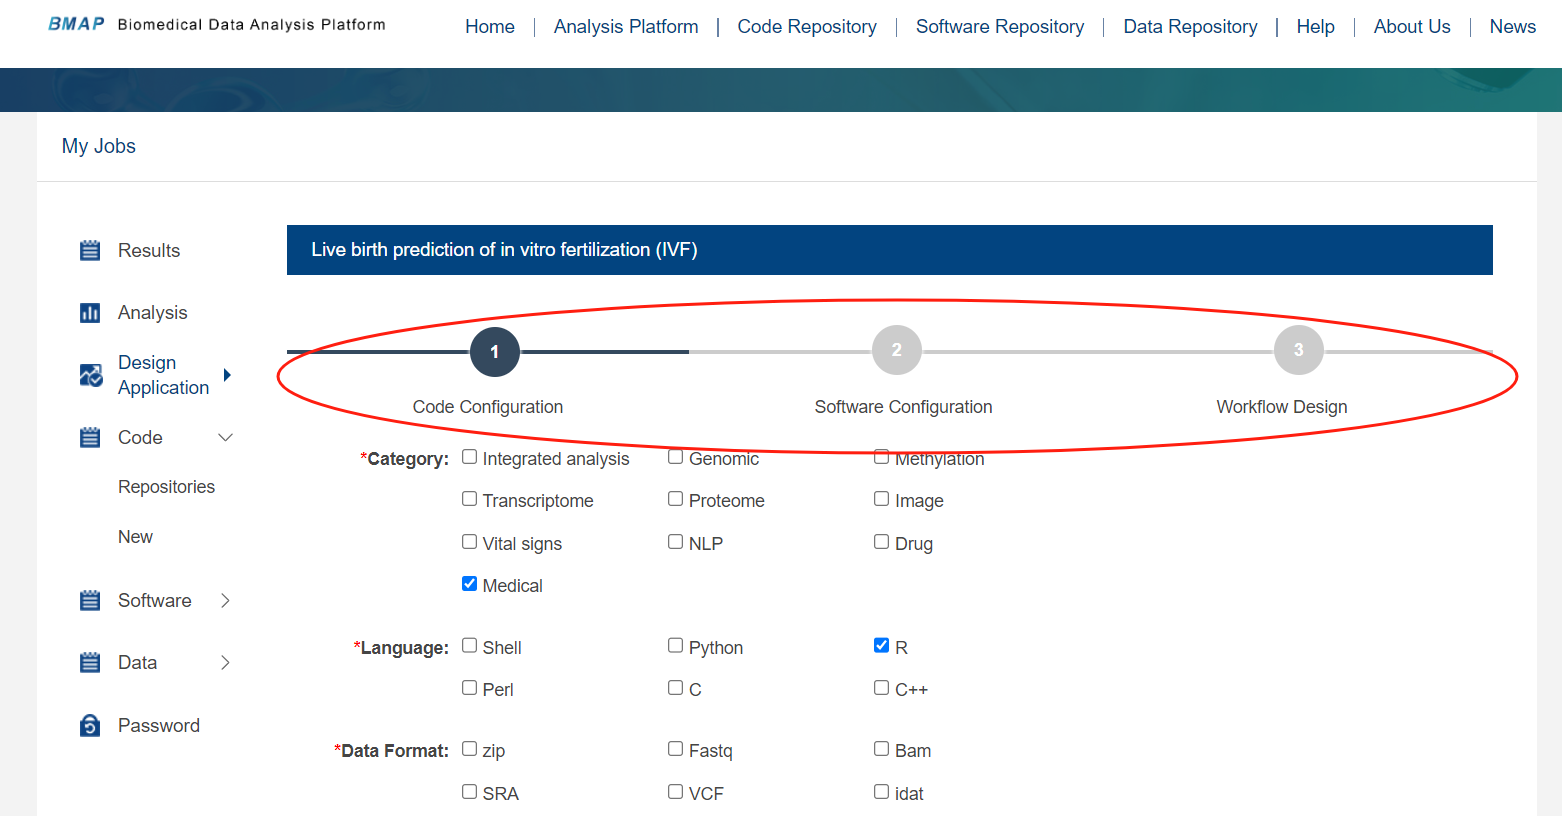
Create a complete workflow that includes code repository configuration, software repository configuration, and workflow design. Once the configuration is complete, you can switch between sections using the top navigation bar.
Code repository and software repository configurations can be referenced and saved as needed.
The main control script template can be viewed at /IVF/workflow_main.sh
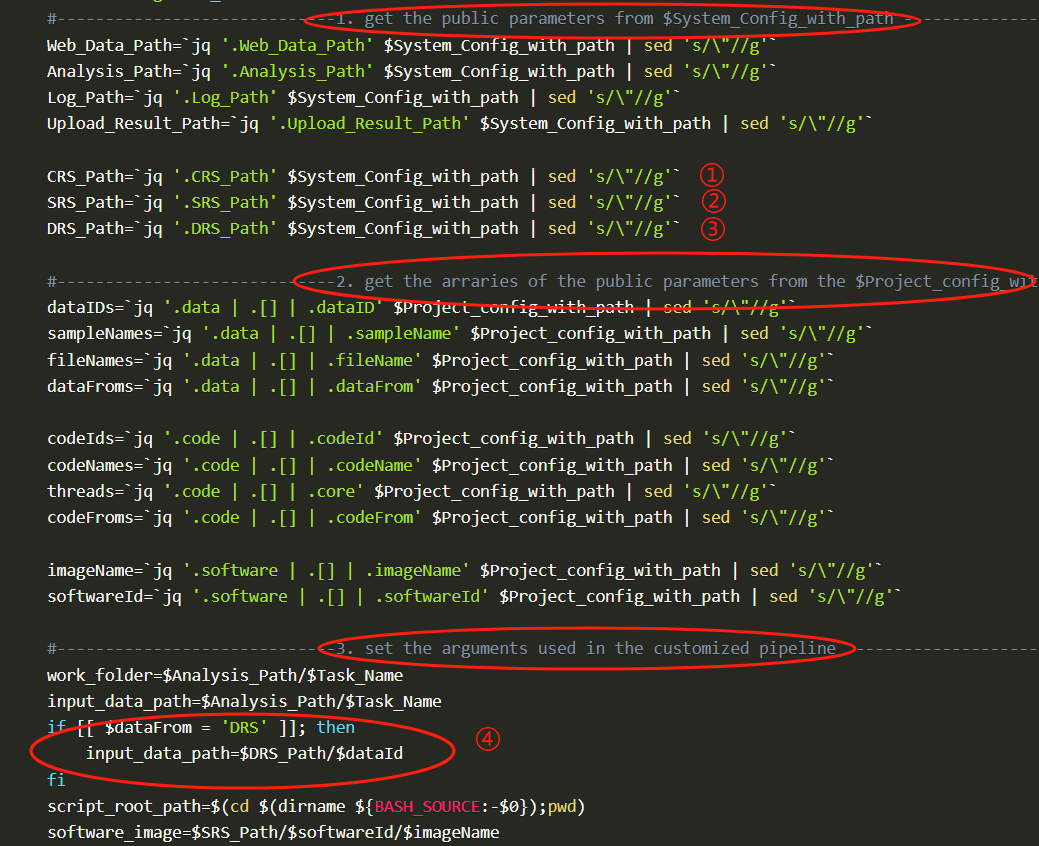
Steps 1–3 mainly involve configuring paths, parameter variables, and declarations used during script execution.Users can directly use the template configuration without modification.
①②③correspond to the configurations for the uploaded code, software, and data storage paths, respectively.
Step 3 primarily declares the working directory and data file path.If using data stored in the repository, the input_data_path will be parsed based on the data ID.
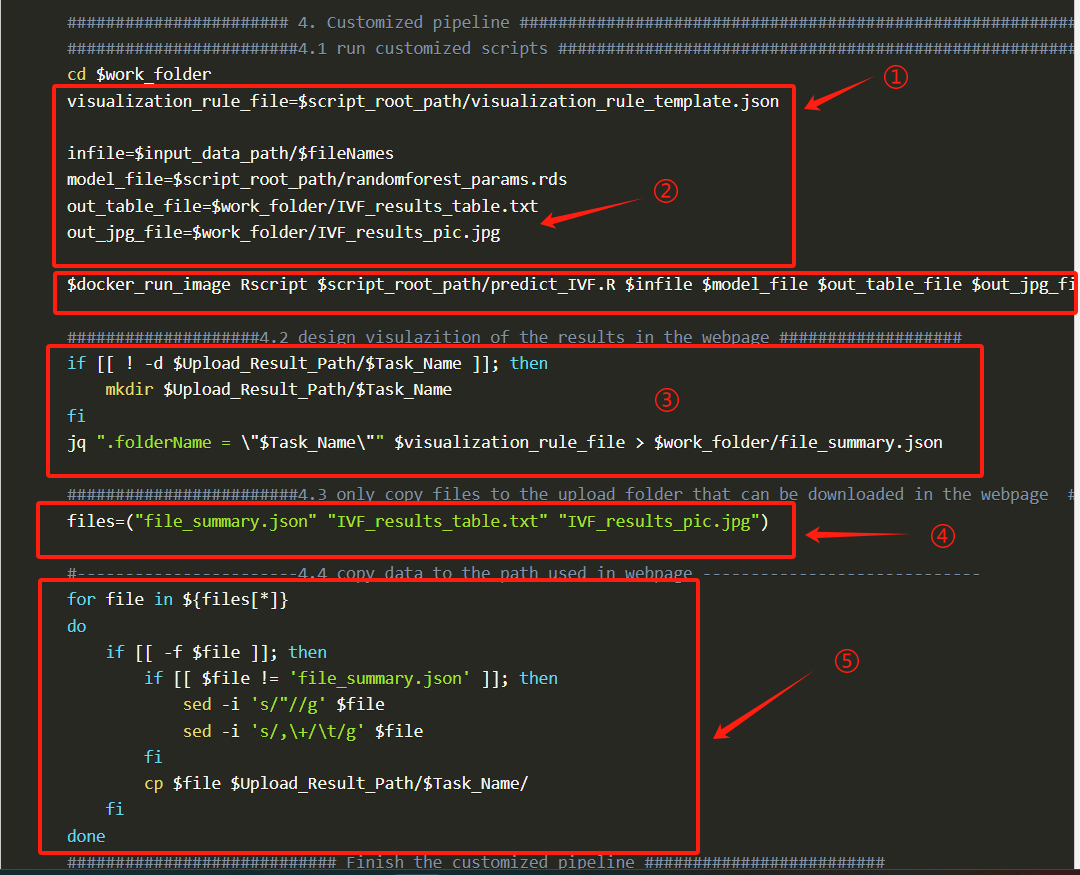
User script customizes the focus on step 4 for writing.
① Declare the need to use the file path from the uploaded code.②=>Output product type and path configuration, including IVF configuration for producing tables and image formats.
Output product types and path configurations, including IVF configuration for producing tables and image formats.In the diagram, "docker_run.Rscript..." defines the execution procedure, executing the corresponding script file "predict_IVF.R" using R scripts. It includes input files ($infile), model files ($model_file), output products, and other parameters as required.
③ The web interface displays the results according to the file_summary.json generated by $visualization_rule_file (which is visualization_rule_template.json). For detailed configuration, please refer to the following figure:
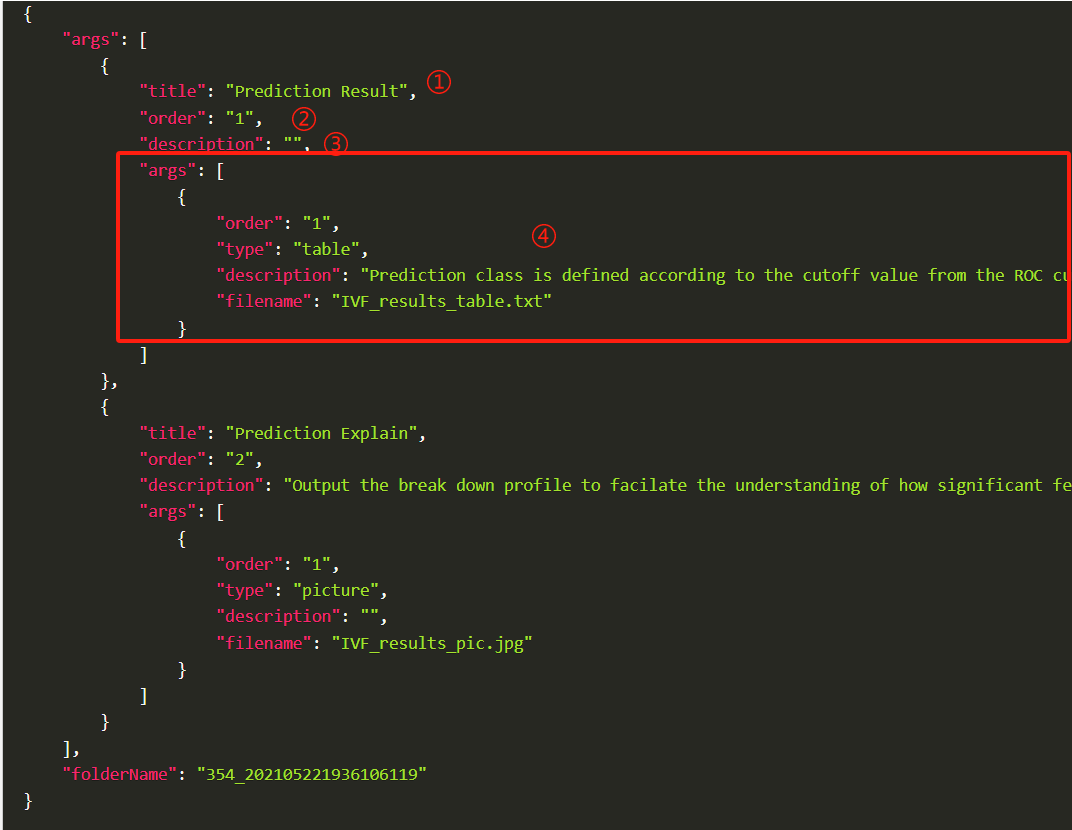
①②③: Display title, Sorting, Content overview
④: Configure multiple sets of product result display, 'type' supports 'table', 'picture', etc., 'filename' indicates the name of the product.
For specific configuration display effects, see the screenshot of the analysis result details page later.
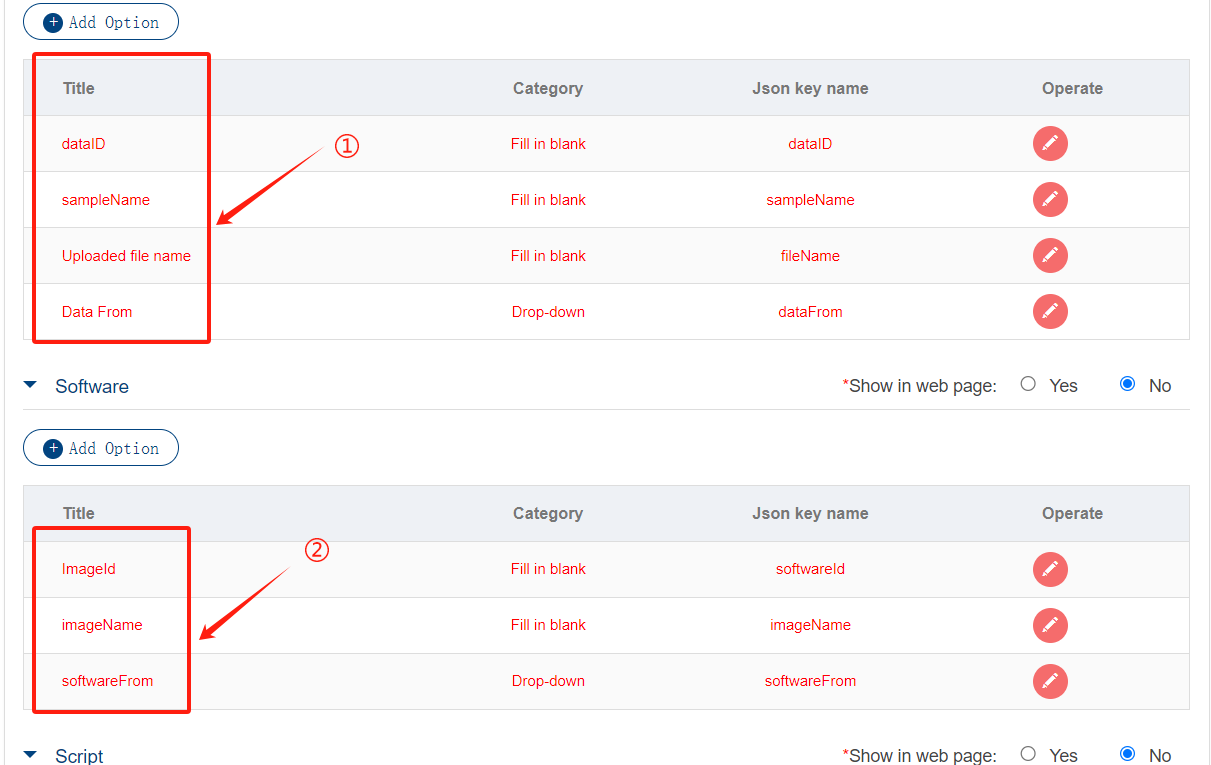
The parameters with red titles are all public parameters. For custom parameters, see the App workflow design section above to view creation and entry.
①-dataID is the uploaded data repository ID (or use the shared data repository on the platform)
①-samplenameuses the specified file to be analyzed in the data warehouse, and relative paths need to be written for multiple levels
①-DataFrommeans using data sources, supporting the use of existing data warehouses or uploading analytical data during analysis
②-ImageIdis the image ID uploaded, which can be found by viewing the software repository information preview in step 3
②-ImageNameupload sif image name
②-softwareFrom,default SRS
Configure Script parameters, confirm and enter values when performing test or analysis tasks as needed
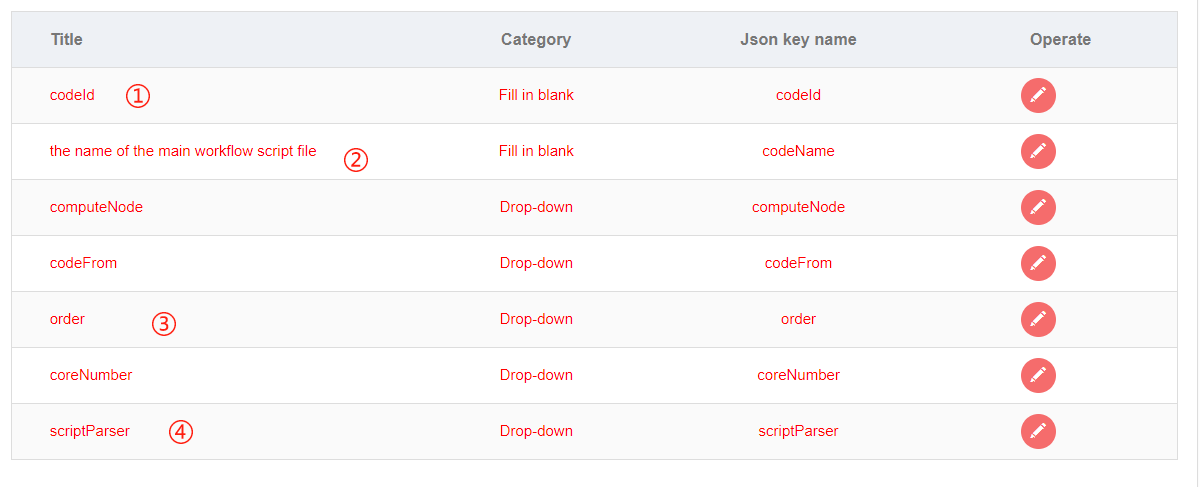
① The corresponding ID of the code repository used
② User script name
③ Sorting
④ Script parsing, such as bash
After the information is entered, you can use the IVF to perform the test task
Submit for review
Select the APP to be submitted in the Design Application list, click "Apply for release" and fill in the Job ID of the successful test
In the background "Analysis Platform->List" section, in the 'Operation', click the four buttons: pipeline, result, modify and delete.
Click pipeline to enter the second-level page and synchronize the design application interface of the user's APP to the interface. You can view and modify the contents of each part (introduction, code, software, controls, etc.)
Click result to enter the secondary page, display the result management page, and synchronize the results of the submitted Job ID to the result page for viewing. At the same time, the administrator can re-analyze the result (because the parameters and data are all there). When re-analyzing, a new ID is created and the information is synchronized to the Job ID, without affecting the results of the original job ID.
Use the created "IVF" workflow to submit the test task to verify the script and expected results
Submit the task by clicking "test" in the operation column where IVF is located in the Design Application list
When using the App shared on the platform, you can quickly navigate to the App interface you want to understand or use by clicking "Analysis Platform" at the top
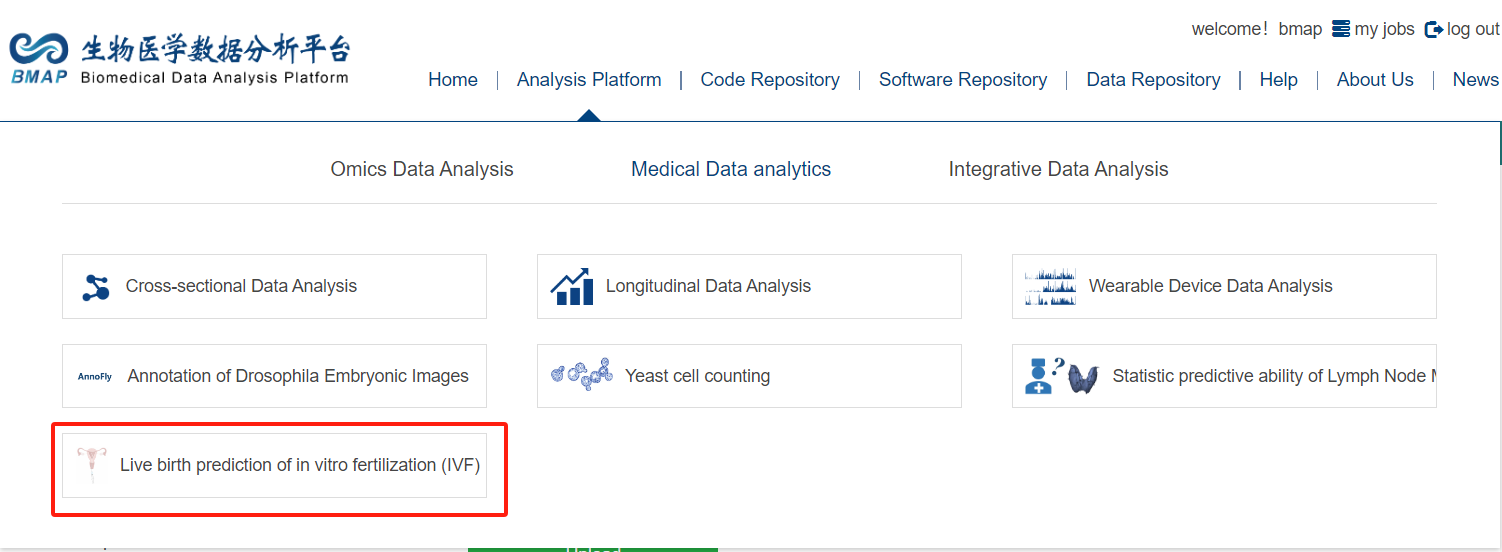
App introduction is divided into Workflow introduction, Case, Analysis submission task, Versions version description, Manual, Download download the authorized App to facilitate localized installation
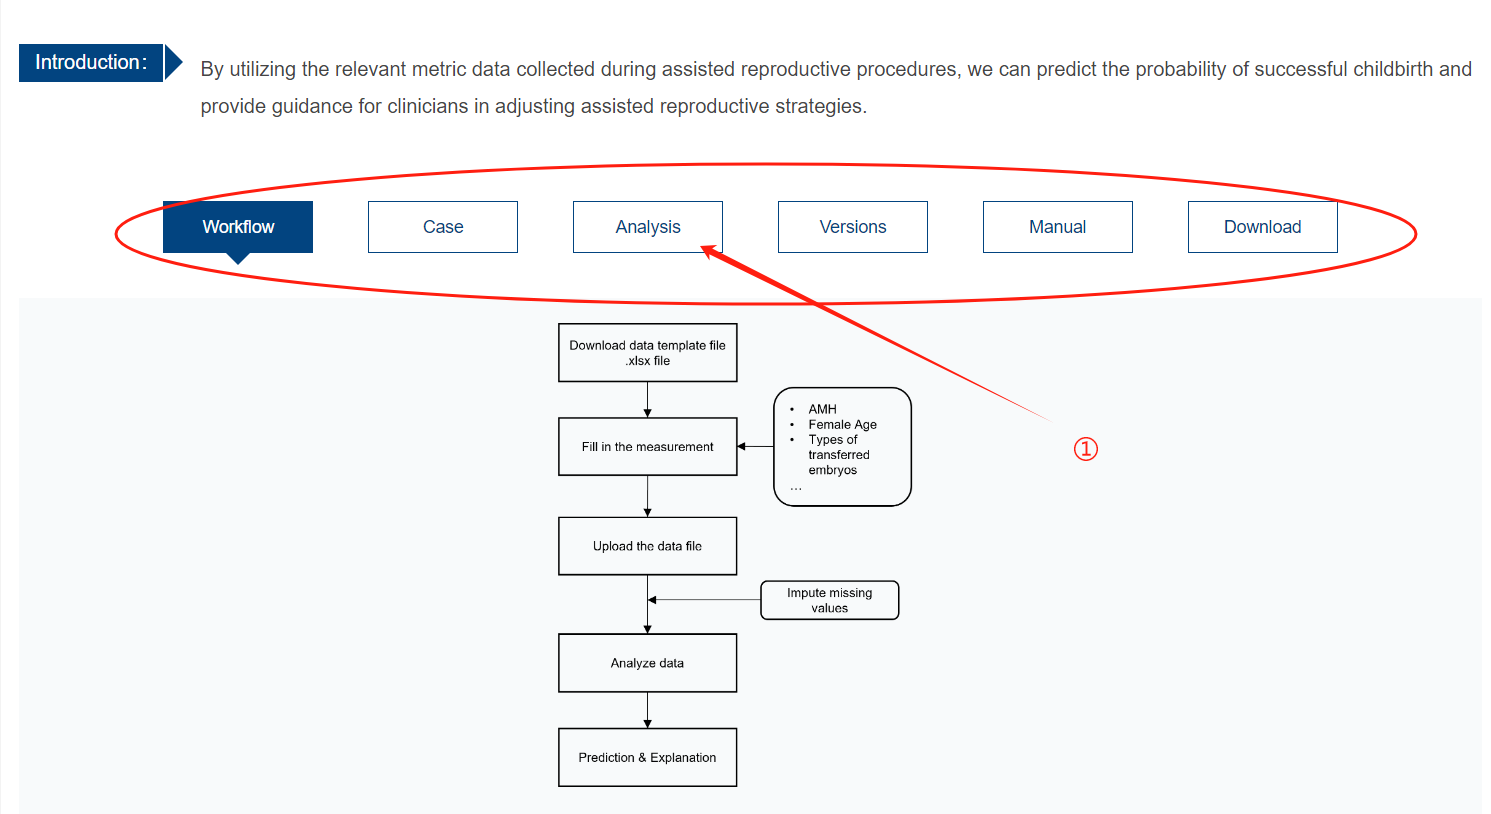
① Click Analysis to configure the task and select the corresponding Workflow according to the process
See the figure below for parameter configuration
① Enter the name of the analysis task
② You can enter the form by clicking example , and the value is the example value configured for the workflow parameters.
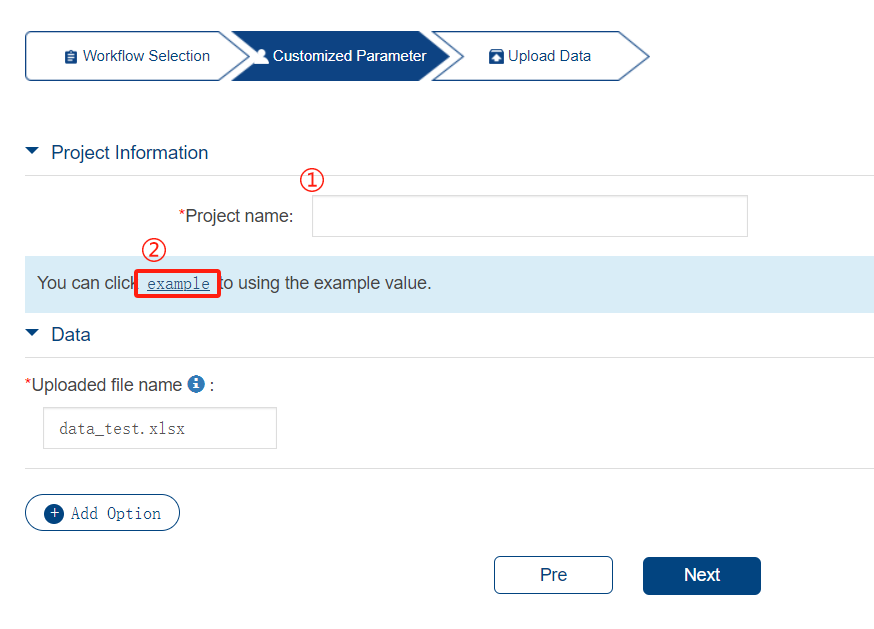
Upload Data uploads the data used in the analysis process. If DataFrom is configured as DRS, no data needs to be uploaded and the program uses the entered storage data.
After submission, wait for the analysis task to complete. The analysis result status includes Analyzing, Complete, and Failed.
Share results display
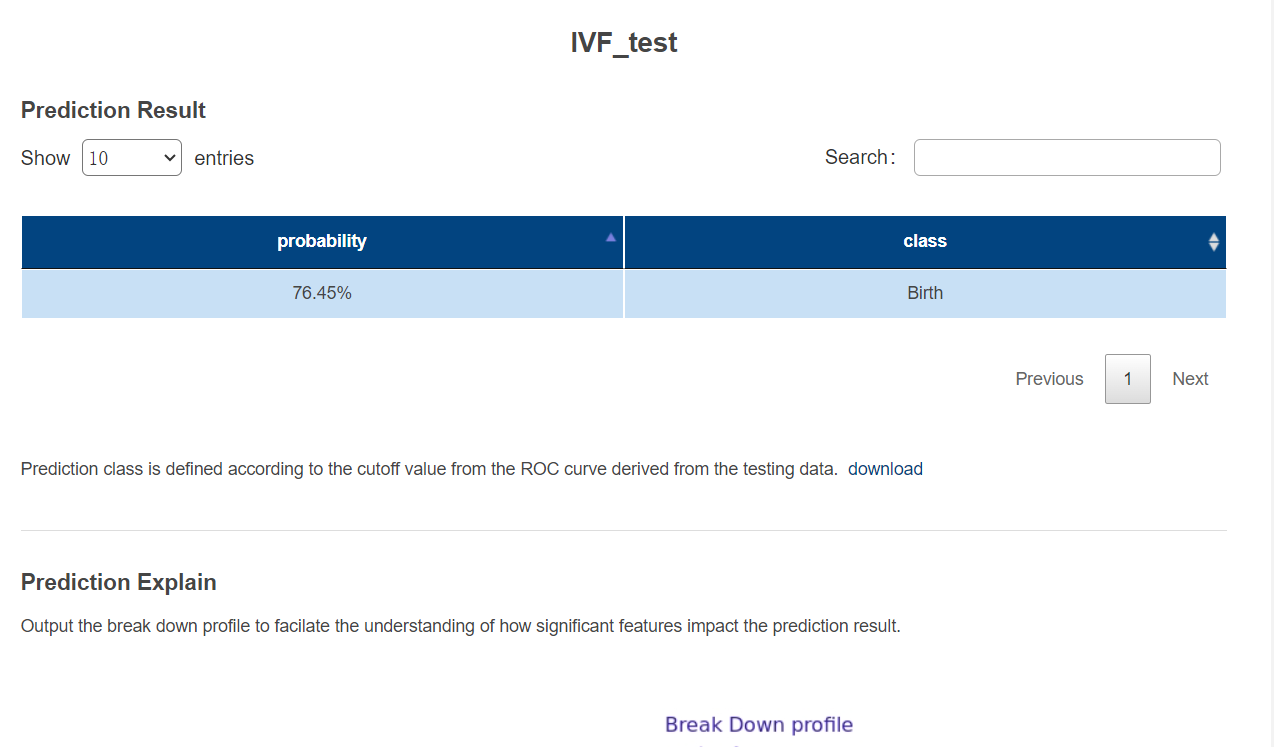
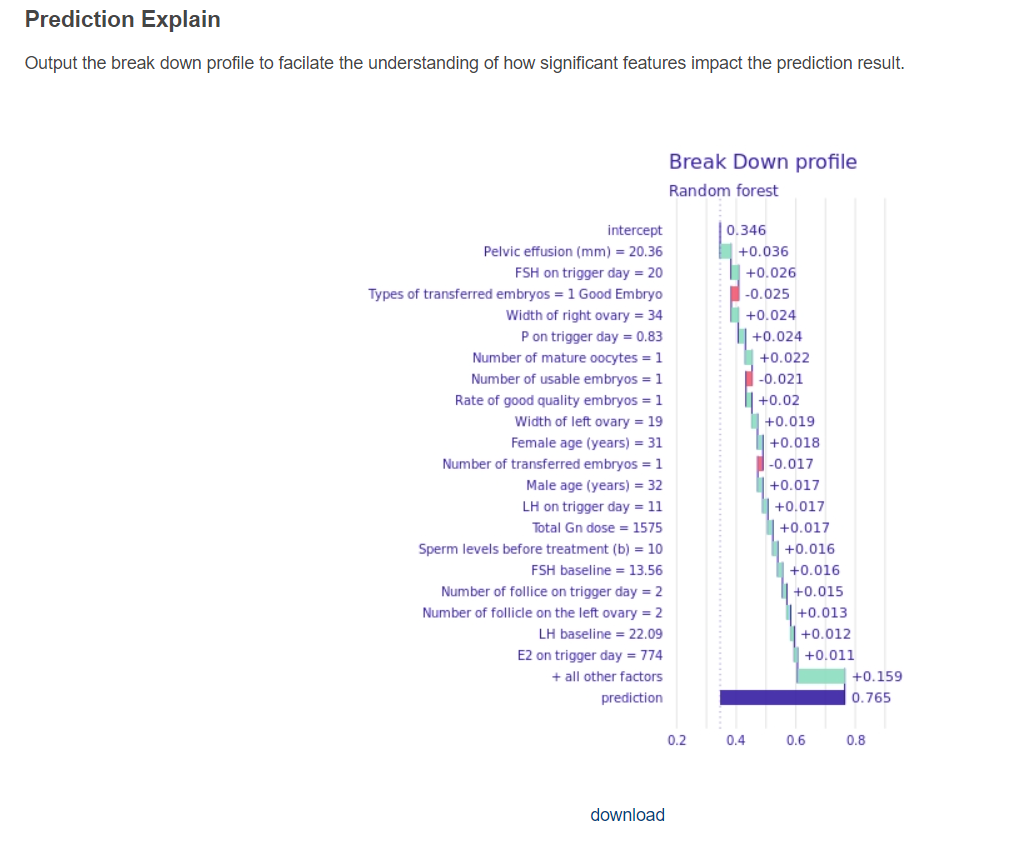
The products and results of the analysis can be downloaded to the local computer.
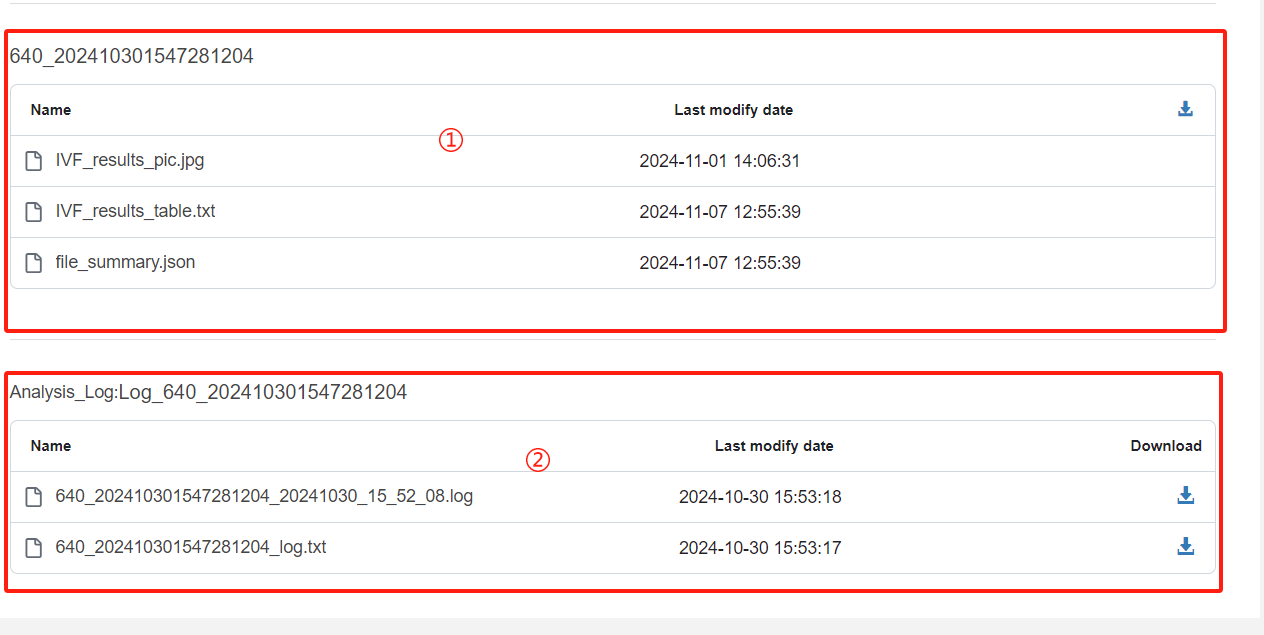
In the figure below ① is the analysis result product of the configuration output, which supports package download
② Analyze the process and script execution logs, support analysis log downloads, and facilitate problem tracing
Authorized openApi users can access the OpenInfo menu to view their account's key and obtain a token to call the openApi interface. Please refer to the Docs for detailed documentation
 Address: 800 Dong Chuan RD. Minhang District, Shanghai, China SJTU-Yale Joint Center for Biostatistics, SJTU
Copyright © 2021 沪交ICP备20190249. All Rights Reserved